
Let’s see how to access the control of your Raspberry Pi. All releases of Raspberry Pi after Model B come with onboard Wi-Fi capability. This means you can connect both PC/Laptop and Raspberry Pi to Wi-Fi and easily tap into your powered Raspberry Pi via desktop (Windows OS) with the help of software such as Putty and VNC Viewer. However, when you purchase a fresh, out of the box headless Raspberry Pi (meaning a Raspberry Pi without a monitor, keyboard and mouse), it gets a tad bit difficult for your network to pick up the IP address of the Raspberry Pi.
This is probably because your brand new Raspberry Pi isn’t SSH (Secure Shell Protocol) enabled by default. SSH allows remote login and other network services to operate over an unsecured network. Following are the steps to help you access control of your Raspberry Pi hassle free and work quite the same for any other model of Raspberry Pi having onboard Wi-Fi capability:-
- Visit https://www.raspberrypi.com/software/ →Manually install an operating system image →See all download options →Select Raspberry Pi OS with desktop →Download and extract 2022-01-28-raspios-bullseye-armhf.zip file.
- Install Win32 Disk Imager software to write the disk image of the Raspbian OS onto the MicroSD Memory Card. Additionally, you can also install the SD Memory Card Formatter software to erase the previous contents of the Micro SD Memory Card. (Size of the Memory Card depends on your purpose and Raspberry Pi model. )
- Create a file named “wpa_supplicant.conf” with the following content:-
ctrl_interface=DIR=/var/run/wpa_supplicant GROUP=netdev update_config=1 country=IN #ISO code of your country network={ ssid="Wi_Fi" #Your Wi-Fi name psk="password" #Your Wi-Fi password key_mgmt=WPA-PSK #Your Wi-Fi security type } - Create another empty text document file named “ssh.txt”. Save “wpa_supplicant.conf”, “ssh.txt” in your MicroSD Memory Card. This will enable SSH on your Raspberry Pi.
Connecting a PC/Laptop to Raspberry Pi via Wi-Fi
Follow these steps to connect a PC/Laptop to Raspberry Pi via Wi-Fi:-
- Save the Raspbian OS disc image, wpa_supplicant.conf, ssh.txt files onto the MicroSD Memory Card. Insert the MicroSD Memory Card into your Raspberry Pi and connect it to a 5V power supply.
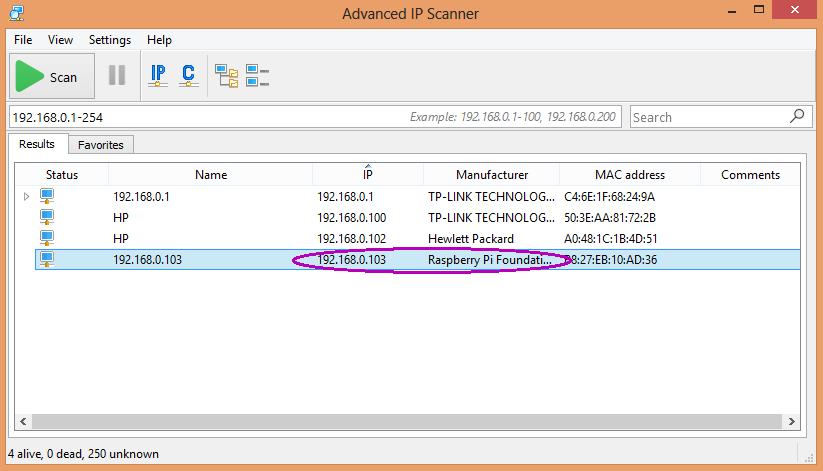
- On the desktop of PC/Laptop, install the Advanced IP Scanner software to find the IP address of your Raspberry Pi.
- On the desktop of a PC/Laptop, use Putty software to enter the IP address of Raspberry Pi and log in to access its terminal (by default user name is “pi” and the password is “raspberry”). Configure the VNC server on the Raspberry Pi.
- Additionally, you can also check if your Raspberry Pi is connected to Wi-Fi (keep the Wi-Fi ON) by typing the following commands in the terminal of the Raspberry Pi:-
sudo iwlist wlan0 scan | grep ESSID
iwconfig
- On the desktop of a PC/Laptop, use VNC viewer software to gain access to the desktop of your Raspberry Pi. (It is normal for the IP address of your Raspberry Pi to change. Use Advanced IP scanner software to again find the IP address of your Raspberry Pi.)

Follow her socials: Linkedin | Instagram | GitHub
- Explore Electronic Design Simulators with Arduino MAX7219 Heart Match Game - January 26, 2026
- Word Clock using MAX7219 LED Dot Matrix Display - November 23, 2025
- The Future of Quantum Computing: What Will We Choose to Do? - September 27, 2025